
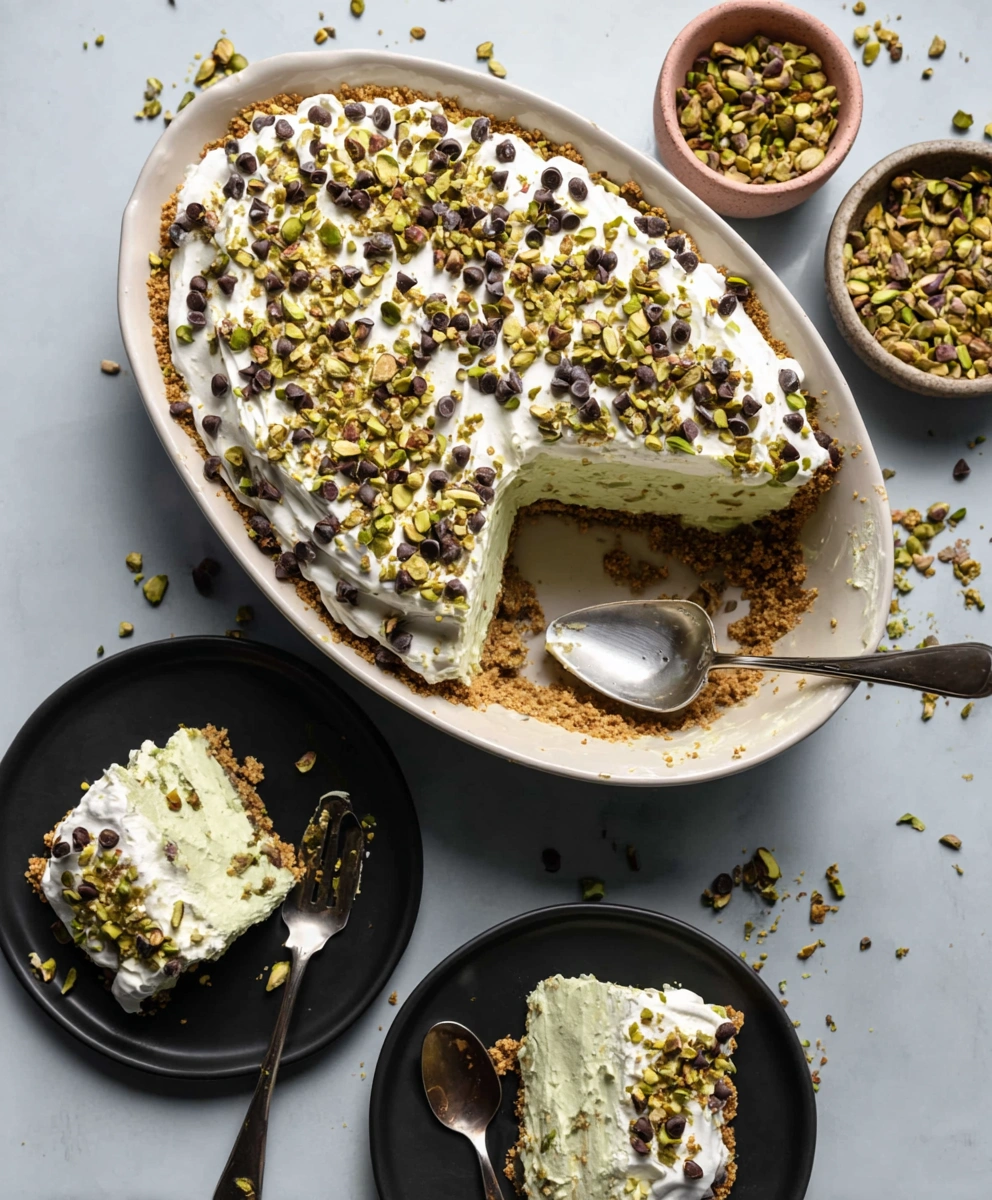
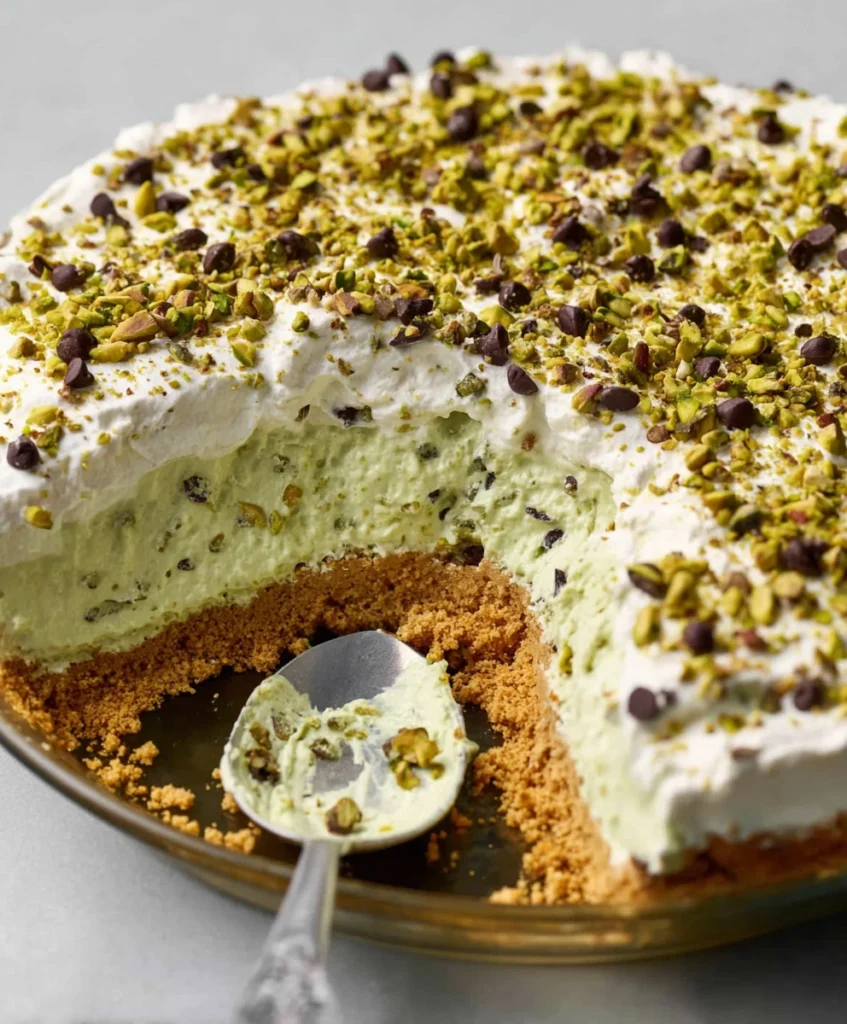
If you love the creamy, nutty flavor of pistachio and the classic taste of Italian cannoli, this No Bake Pistachio Cannoli Pie is the perfect dessert. It has a crunchy waffle-cone crust, a light pistachio-ricotta filling, a layer of whipped cream, and a sprinkle of chocolate chips and chopped pistachios. It’s elegant, simple, and requires absolutely no baking, making it ideal for gatherings, holidays, or quick make-ahead desserts.
Ingredients
For the Crust
- 7 oz waffle cones (about 12 cones)
- ¼ teaspoon salt
- ½ cup melted unsalted butter
For the Whipped Cream Topping
- 1 ½ cups cold heavy whipping cream
- ½ cup mascarpone cheese (optional but helps stabilize the whipped cream)
- ¼ cup powdered sugar
- ½ teaspoon vanilla extract
For the Pistachio Cannoli Filling
- 3 cups ricotta cheese (about 32 oz), strained
- ¾ cup unsweetened pistachio butter
- 1 ½ cups powdered sugar
- 2 teaspoons vanilla extract
- 2 teaspoons orange zest
- 1 cup mini chocolate chips
- Pinch of salt
Optional Toppings
- Chopped pistachios
- Mini chocolate chips
Step-by-Step Instructions
1. Strain the Ricotta
Place the ricotta in a cheesecloth or a fine strainer lined with paper towels. Let it drain in the refrigerator for a few hours or overnight. Removing excess moisture prevents a runny filling.
2. Prepare the Crust
Crush the waffle cones into fine crumbs using a food processor. Add salt and melted butter, then mix until the texture resembles wet sand.
3. Press the Crust
Press the crust mixture firmly into the bottom of your pie dish (a 12.5-inch gratin dish, 9×13 pan, or a deep pie pan works). Pack tightly using the bottom of a measuring cup. Refrigerate while preparing the filling.
4. Make the Whipped Cream
Use an electric mixer to whip the heavy cream, mascarpone, powdered sugar, and vanilla extract until stiff peaks form. Set aside.
5. Make the Pistachio Filling
In a large bowl, mix the strained ricotta, pistachio butter, powdered sugar, vanilla, orange zest, and salt. Beat until smooth and creamy. Fold in the mini chocolate chips.
6. Lighten the Filling
Gently fold about one cup of the whipped cream into the pistachio filling to make it lighter and silkier.
7. Assemble the Pie
Spread the pistachio filling evenly over the chilled crust. Then add the remaining whipped cream on top. Smooth the surface with a spatula.
8. Add Toppings
Sprinkle chopped pistachios and mini chocolate chips on top for extra crunch and decoration.
9. Chill
Cover and refrigerate the pie for at least 2 hours. Overnight chilling gives the best texture.
10. Serve
Scoop and serve cold. The texture remains creamy and refreshing.
Tips for the Best Cannoli Pie
✓ Strain the Ricotta Well
This is the key to a thick, sliceable filling that doesn’t get watery.
✓ Use High-Quality Pistachio Butter
Unsweetened pistachio butter gives a naturally rich nutty flavor.
✓ Don’t Skip the Orange Zest
It adds a bright flavor that balances the sweetness.
✓ Chill Long Enough
The pie firms up beautifully when given enough time to rest.
Storage Instructions
- Store the pie in the refrigerator for 3 to 4 days.
- Keep it covered tightly to prevent the whipped cream from drying out.
- Freezing is not recommended because ricotta-based fillings can separate.
Variations
Chocolate Pistachio Version
Add a layer of melted chocolate between the crust and the filling.
Gluten-Free Version
Use gluten-free waffle cones or gluten-free cookies.
Pistachio Crunch Version
Add crushed pistachios into the crust for extra nuttiness.
Mascarpone Variation
Replace half the ricotta with mascarpone for a richer filling.